Jesus + Family + Food = Life

Search This Blog

Showing posts with label easy. Show all posts

Tuesday, June 25, 2013

Chicken-tot Casserole

Ingredients:
1 lb. boneless, skinless chicken
1 can mushroom soup
1/2 small onion, chopped
1 rib celery, chopped
1 bag frozen tater tots 
1/4-1/2 cup shredded cheddar cheese

Directions:
Cut raw chicken into bite-sized pieces. Pan fry with a small amount of olive oil until cooked through.  Salt and pepper can be added in this phase for added flavor.  Add onions and celery, and remove from heat when onions are translucent.  This was a prepare-ahead meal, so at this point, I allowed the chicken and veggies to cool. You could also prepare and bake right away. 
Spray an 8 x 8 baking dish with Pam, and add the chicken. Try to make it as even as possible. Spread mushroom soup evenly over chicken. (Feel free to add milk or broth to make more gravy, but I thought it was perfect without additional liquid). 
Next, completely cover chicken and soup with a layer of tots. Sprinkle cheese on top of the tots. 
Cover with foil and bake at 350 for about 25 minutes. Then remove foil and increase heat to 375. Bake until the tater tots are golden and crispy. Serves 4-5. 

Notes: Good freezer-meal option (thaw first), make early-bake later, or prepare at meal time. Just be aware that frozen tots will extend baking time. For big families, double the recipe and use a 9 x 13 baking dish. Buy gluten free and dairy free products for an allergy-friendly meal. 

Friday, October 26, 2012

31 Pins: Day 26

Now THIS is a good use for plastic eggs!


Original pin:


Elli is really into letters right now.  She is picking them out left and right.  "Mom, that's a C!  I learned that letter!"  Brings a smile to my face to know that my efforts are paying off. :D


This pin is simple, yet versatile.

Even the little ones can get involved! (with supervision, of course... these do pose a choking hazard, so be careful!)


I matched up the egg tops and bottoms (some match in color, some don't for a bit more difficulty).  The site suggested stickers, but I just went with Sharpie.  Write the capital letter on top (the bigger part) and the lower case letter on the bottom.  


Separate and let the learning continue!


Also, you could place a small treat (m&m or sticker) inside of each egg.  Tell the child to find the Dd egg.  If he/she picks the right one the first time, they get the treat!  If not, save for next time.  Also, eggs can be hidden around the house.  With multiple kids, you can keep score of  who can find AND identify the most.  Or, forget the competition... kids love hunting eggs. :)

Saturday, October 20, 2012

31 Pins: Day 20


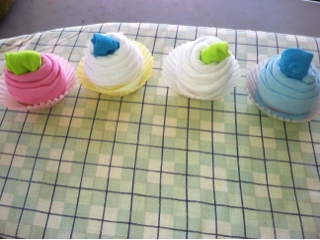
I have a friend with twins, and their first birthday party is today. :)  I saw this idea the other day and immediately wanted to try it.  Seeing as how their mother is really good at making cakes and cupcakes, this fit perfectly.  I looked up a few ideas about gifts for twins, and this is what I came up with!

Original pin:


What is up with these super long, skinny pins???

I gathered my supplies - onesies, iron-ons, scissors, ironing board, iron, rubber bands, tape, cupcake baking cups

Of course my printer is running out of color ink...  Sorry!  It comforted me to know that they will only be wearing these for a short time. :)  I really wanted to write GF and DF on these, lol.  This family has taught me a lot about food allergies!

Don't be hasty, or you will iron something on upside down!!! :(
But seriously, is this the cutest twin thing ever?  Their mommy and I text often, so it was fitting.

I had to do this a few times to get it right, but fold the onesie twice and roll up a sock in the middle.

It should be bigger at the top (look like icing), and smaller at the bottom (like a cupcake!).

At first, I tried taping the shirt to get it to stay rolled, but then ended up using a rubber band instead.  Then I taped the shirts in the cupcake cups so they would not fall off.


I could have bought a cupcake box, but found this cute one in my collection instead.  What do you know?  They fit perfectly!

Thursday, October 18, 2012

31Pins: Day 18

Cake in the form of a brownie.  Yum.


I was so going to do a "nails" pin today.  I saw a great idea about painting glitter between two layers of sheer polish.  Well, turns out I don't have the right glitter or sheer enough polish to do this!  So, here I sit with one hand done (again) at 10:20 writing this post because I did this one late in the day.
Josh needed something sweet for his lunch tomorrow, and I easily found a dessert pin to try.

Original pin: 
Click image for original recipe


Simple ingredients: cake mix (I just used the one with the sprinkles already in it), egg, oil, milk, and optional chocolate chips.
Add egg and oil first, then milk just until moist.  Aiming for a very dense cake.
Bake at 350 for 25-30 minutes.
She was adamant about the edges being just golden and pulling away (the original blogger, that is).

We let it cool for a while to set up, but then tried a piece.  It is VERY GOOD.  Especially if you love cake!  No need for icing with this recipe.  It is super rich by itself. :)

I may try with chocolate if I don't have brownie mix sometime.  Might be a little different than what we are used to in a brownie, but I think it would be good!  I will update if I ever try.

Tuesday, October 16, 2012

31 Pins: Day 16

Day 16 - Over half way done!


This is a Cricut craft I found a while back.  I put my own little spin on it though. :)

Original pin:


Basically, you pick an animal from a cricut cartridge (or trace an animal silhouette onto the back of a piece of scrapbook paper).  Apparently you can google "animal silhouette" or something and a bunch will appear.  Matte it on plain scrapbook paper and frame.  Voila!

The Result:


I realize that not everyone will find this funny.  But we sure do! LOL

I had an extra frame lying around, so this was a free, easy pin with a minimal time requirement.  I did break the glass from the frame on my way to clean it, but that is normal for me.

Friday, October 12, 2012

31 Pins: Day 12

3-2-1 Cake!


My mom actually found out about this one, gave me the recipe, and a premixed bag of the ingredients.  I was keeping it up my sleeve for a day like today.... busy!  I found a pin the next day so I could try it out. ;)

Original pin:

There are only a few ingredients to this quick, simple cake.  The dry mix requires a box of angel food cake, and a box of whatever regular cake mix you prefer (chocolate, white, yellow, etc.).  My mom mixed carrot cake mix in hers.  You will have quite a bit of mix, so it could be given out as a gift or kept on hand for a craving fix. :)

The other things needed are: a mug, spray oil, and water.  That's it!!


You are probably wondering why it is called 3-2-1 cake...  That is the cool part!     
Mix 3 Tablespoons of cake mix with 2 tablespoons of water, 
and microwave for 1 minute.
3-2-1 Cake!


Looks like a sponge...


...but is not bad for a quick fix!  It certainly would have been better with some cream cheese frosting, but not necessary.  I look forward to trying different flavors of cake with this one.  The strawberry in the original pin looks yummy!

Expense rating: Inexpensive (2 boxes cake mix)
Difficulty rating: EASY

Thursday, October 11, 2012

31 Pins: Day 11


One of my few coffee-drinking friends was visiting with her littles today, and she helped me to pick today's pin... Pumpkin Spice Lattes!

Original Pin


Who wants to pay $3-5 (or more) for one of these babies?  Not me....  Well, I guess if it is in a quaint cafe free of children, it might be worth it. ;)  
Anyway, if you can't get out of the house, you can set up your own little bistro and enjoy a home made version of this fall favorite.

The results:


Ingredients: milk, vanilla, canned pumpkin puree, pumpkin pie spice, espresso/strong coffee, sugar (click the original pin above for the specific amounts)


While brewing the coffee, place all other ingredients in a saucepan and do not quite bring to a boil.


Pour into a blender and and blend for about 2 minutes.  This is how the froth forms.  (Make sure to hold the lid down so you don't make a mess, lol).


Pour the milk mixture into your favorite mug first (this makes two 10 ounce servings, so it will need to be a bigger one).  Then, on the side, pour in the coffee so as not to disturb the froth.


I think she liked it!

Difficult rating: EASY
Expense rating: CHEAP
Taste rating: Delicious!!!


Wednesday, October 10, 2012

31 Pins: Day 10

Hebrews 6:19 This hope we have as an anchor of the soul, both sure and steadfast, and which enters the Presence behind the veil, 20 where the forerunner has entered for us, even Jesus, having become High Priest forever according to the order of Melchizedek.


I had a few things up my sleeve today, but could not decide exactly what to work on.  Around 3 in the afternoon, I had my mom look through my pins to see if she had any thoughts.  This one grabbed her eye (the t-shirt).  I just happened to find $1 shirts at Walmart yesterday while shopping for groceries.  (Bargain shopper's dream!)  And bleach is always on hand, so I went with it.  
... But wait.  What would I put on it?  How about that design (based on scripture) that I have been thinking about for weeks?? (second pin)  It was a match made in heaven.  Therefore, today we have TWO
original pins:


Love anchors the soul. Hebrews 6:19


I printed the image onto card-stock paper.  Something a little thicker so nothing could soak through.  Then, I put a piece of cardboard inside the shirt (also, so nothing could soak through).  I placed the cut-out on the shirt where I wanted the design and ironed it flat (it was very thin and flimsy).  Added some extra newspaper just in case.  Working with bleach, one never knows!
The original pin did not link through to a site (boo), but I googled it and found a mixture: 30% bleach, 70% water.  To be honest, I didn't even measure.  I found a spray bottle, threw some bleach into it, and then added water.

I made sure the sprayer was misting instead of a direct stream before getting started.  Finally, I spritzed the shirt 5-10 times making sure I got in and around the cut-out.


Almost immediately we could see the shirt starting to change color.  When it lightened up a bit, I put it in the dryer for a few minutes (instructions from another website).  The only thing I noticed is that I forgot to cut out the hole in the anchor, of course.  So I dabbed a little more bleach water right in the center of the circle and re-dried.  


I LOVE how it turned out!  I thought about adding the Bible verse and notation, and potentially the heart, but I did not think a Sharpie would do it justice.  If nothing else, it is a conversation starter. :)

Expense rating: CHEAP
Difficulty rating: EASY
Related Posts Plugin for WordPress, Blogger...